5-Aug-2020
 Refractories due to their chemical
complexity and phase change undergo fusion
(melt progressively) over a range of temperature. This softening behaviour or
refractoriness of any refractory material is determined by PCE test which is
done in a PCE furnace by comparing
ceramic specimen of known softening behaviour (either in ORTON or SEGAR Cones)
with the Cone of the refractory material. Value of PCE Cones in ORTON is
followed in British standard while SEGAR is in German standard of testing. To
view / download PCE Cone numbers with their temperature please click -
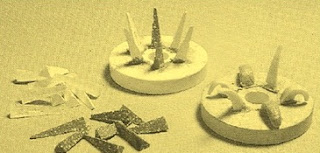
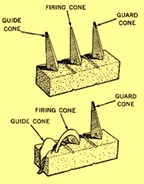
 PCE Cones are small triangular ceramic
prisms of definite dimensions that when set at a slight angle bend over in an
arc so that the tip reaches the level of the base at a particular temperature
if heated at a certain rate (Refer Figures showing PCE Cones set on plaques
before and after firing). The bending of the Cones takes place after the
formation of a viscous liquid as a result of fusion of the Cone material. PCE
is measured by making a Cone of the refractory and firing it until it bends and
comparing it with standard Cone(s). Pyrometric
Cone Equivalent or PCE test is a must for the quality control purpose
for Refractories and Refractory raw materials.
The thermal
softening behaviour of a refractory material technically known as ‘Refractoriness’, is determined by Pyrometric
Cone Equivalent (PCE) test. In other words, by Pyrometric Cone Equivalent (PCE)
of a refractory material we come to know about its ability to withstand exposure to elevated temperature
without undergoing appreciable deformation.
 Refractories due to their chemical
complexity and phase change undergo fusion
(melt progressively) over a range of temperature. This softening behaviour or
refractoriness of any refractory material is determined by PCE test which is
done in a PCE furnace by comparing
ceramic specimen of known softening behaviour (either in ORTON or SEGAR Cones)
with the Cone of the refractory material. Value of PCE Cones in ORTON is
followed in British standard while SEGAR is in German standard of testing. To
view / download PCE Cone numbers with their temperature please click -
 PCE Cones are small triangular ceramic
prisms of definite dimensions that when set at a slight angle bend over in an
arc so that the tip reaches the level of the base at a particular temperature
if heated at a certain rate (Refer Figures showing PCE Cones set on plaques
before and after firing). The bending of the Cones takes place after the
formation of a viscous liquid as a result of fusion of the Cone material. PCE
is measured by making a Cone of the refractory and firing it until it bends and
comparing it with standard Cone(s). Pyrometric
Cone Equivalent or PCE test is a must for the quality control purpose
for Refractories and Refractory raw materials.


